When municipal lines go dark and the taps run dry in August, your attention immediately shifts to alternative water sourcing. In an urban environment, this means harvesting stagnant HVAC condensation, capturing highly irregular summer cloudbursts via improvised gutter systems, or hauling graywater from static utility reservoirs.
The immediate instinct for most people is to pull out a commercial micro-filter (like a survival straw) or dump the murky water straight into a pot to boil it.
This is an operational failure.
Urban surface water is highly turbid, loaded with suspended atmospheric particulates, micro-plastics, and heavy metal soot from vehicular emissions. If you pass this water directly through a commercial micro-filter, the microscopic pore network (0.1 to 0.2 microns) will clog and blind within the first three liters, rendering a $50 tool completely useless. If you boil it raw, you merely evaporate pure water vapor, actively concentrating the toxic sediment and heavy metals left behind in the pot.
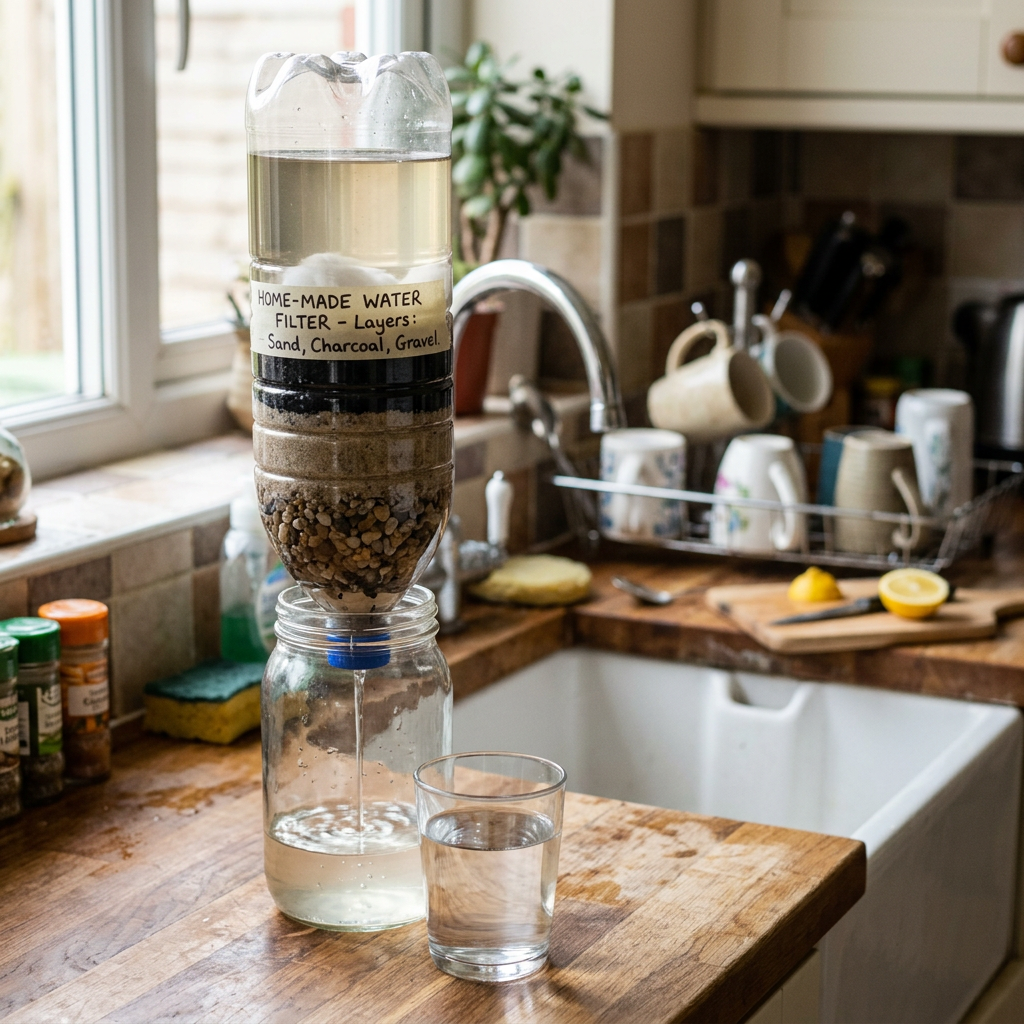
Before water can be disinfected, it must be mechanically clarified. Here is how to engineer a high-volume, gravity-fed vertical clarification column using daily household waste and basic raw materials.
The Physics of Porous-Media Filtration
Mechanical clarification relies on passing a fluid through a packed bed of granular material to strip out suspended solids. The efficiency of this system is governed by two principles: mechanical straining and intermolecular adsorption.
The flow rate of water through your clarification column is mathematically described by Darcy’s Law. To maximize filtration without completely halting the flow, we cannot just pack a tube with tight, dense clay. We must build a descending porosity gradient.
As water moves downward through the column, it must encounter progressively smaller interstitial gaps (void spaces). Large particles are trapped at the top layer before they can clog the finer mechanics below.
[Influent: Highly Turbid Water] │ ▼┌─────────────────────────┐│ Layer 1: Pebbles │ <── Traps macro-debris (leaves, twigs)├─────────────────────────┤│ Layer 2: Coarse Sand │ <── Captures coarse suspended particulates├─────────────────────────┤│ Layer 3: Activated Carbon│ <── Molecular Adsorption (VOCs, chemical toxins)├─────────────────────────┤│ Layer 4: Fine Sand │ <── Final polishing (micro-particulates)└─────────────────────────┘ │ ▼[Effluent: Clarified Water]
Furthermore, we introduce Activated Carbon into the center of the matrix. Unlike sand, which physically blocks particles, carbon operates via chemical adsorption. It possesses an astronomical internal surface area (up to 1,000 m^2/g) packed with microscopic pores that attract and chemically bind volatile organic compounds (VOCs), industrial solvents, and chlorine isotopes on a molecular level.
The Protocol: Constructing the Clarification Column
To build this system in an urban apartment, you will need a 2-liter plastic beverage bottle, clean playground sand (or outdoor soil washed repeatedly to remove clay), clean pebbles, and hardwood charcoal chunks (salvaged from a clean barbecue or a camp fire pit, do not use self-lighting briquettes impregnated with petroleum additives).
Step 1: Prep the Housing Cylinder
Take a clean 2-liter plastic bottle and cleanly slice off the bottom base with a utility knife. This open end serves as your reservoir intake. Take the plastic bottle cap, drill a single 1/8 inch hole directly through its center, and screw it back onto the nozzle. This bottleneck functions as your restricted effluent regulator.
Step 2: The Bed Base and Fine Polish
Invert the bottle so the narrow cap points downward. Push a compressed ball of clean cotton cloth, a sterile gauze pad, or two nested paper coffee filters tightly into the neck of the bottle. This serves as the mechanical retaining wall that prevents your filter media from washing out into your clean water container. Directly on top of this, pour a 3-inch layer of Fine Sand.
Step 3: The Adsorption Layer
Crush your clean hardwood charcoal into small, granular fragments roughly the size of rice grains. Do not grind it into a fine powder, or it will create an impermeable hydraulic block that violates Darcy’s Law and stops all flow. Pour a 4-inch layer of this crushed charcoal directly on top of the fine sand layer.
Step 4: The Coarse Transition
Pour a 2-inch layer of Coarse Sand or very fine gravel over the charcoal. This layer captures intermediate particulates and acts as a mechanical buffer, preventing the charcoal from shifting or floating when water is poured into the column.
Step 5: The Macro Stratum
Top the entire matrix with a 2-inch layer of washed Pebbles or small stones. This heavy layer disperses the kinetic energy of the water you pour in, ensuring the delicate sand layers beneath are not physically disrupted or channeled by the fluid velocity.
The Operational Validation
Once assembled, your clarification column must be primed before use. The initial output will run completely black with loose carbon dust.
Pour clean utility water through the top of the filter repeatedly until the effluent water exiting the bottom cap runs 100% crystal clear. Once the water visually clears, the bed has stabilized and is ready for service.
THE CRITICAL BOUNDARY: Mechanical clarification is completely distinct from biological purification. Your column is engineered to remove turbidity, sediment, bad odors, and organic chemical compounds. It does not remove pathogenic bacteria, viruses, or protozoan cysts (like Giardia).
Once your water passes through the descending porosity matrix, it will look pristine, but it must still undergo secondary disinfection before consumption. Because you have stripped the turbidity, you can now safely use minimal chemical treatments (like 2 drops of unscented household bleach per liter) or a standard boiling sequence without rendering the water toxic or destroying your equipment.
In our next piece, we will look at handling the grim reality of a prolonged water shutdown in a multi-story apartment building, breaking down the fluid dynamics and logistics of The Dry Sanitation Pivot.
Leave a Reply